
For professionals in a business setting, there is an increased demand for presentations that require more than a traditional meeting room setup. This article will provide helpful information on how to connect your laptop to a projector or other display device easily.
Using a laptop in a presentation environment provides an attractive and effective way to create a vivid presentation that requires no additional hardware. However, frequently getting the laptop to work with a projector or other display device is challenging. This article will explore some tips on how to make this process as simple and efficient as possible.
Preparing Your Laptop
Connecting a laptop to a projector is a useful and common way to share information. It is simple and easy to do, but before connecting the laptop to the projector, it is important to properly prepare the laptop. Here is a guide to preparing a laptop for connection with a projector.
Check the connections
Before connecting a laptop to a projector, make sure the projector is on and functioning properly. Then, find the appropriate cables for the connection. Laptop-to-projector connections typically use either a VGA cable or an HDMI cable.
Install drivers
If the projector is relatively new, a driver may need to be installed before the laptop will recognize the projector. The projector manual or a quick internet search should provide the appropriate driver to download and install.
Turn down brightness
For best picture quality, turn down the brightness on the laptop several notches before connecting the laptop to the projector. This minimizes the glare and offers more contrast in the projected image.
Connect laptop and adjust display settings
To connect the laptop to the projector, plug one end of the VGA cable or HDMI cable into the laptop, and the other end into the projector. Then, turn on the projector and laptop and adjust the laptop settings to “projector,” – this allows the laptop to recognize the projector.
Connecting to the Projector
Connecting your laptop to a projector is a great way to share information or impress your colleagues with a presentation. However, you may find connecting it to be difficult. But don’t worry! By following these steps, you’ll be easily connected in no time.
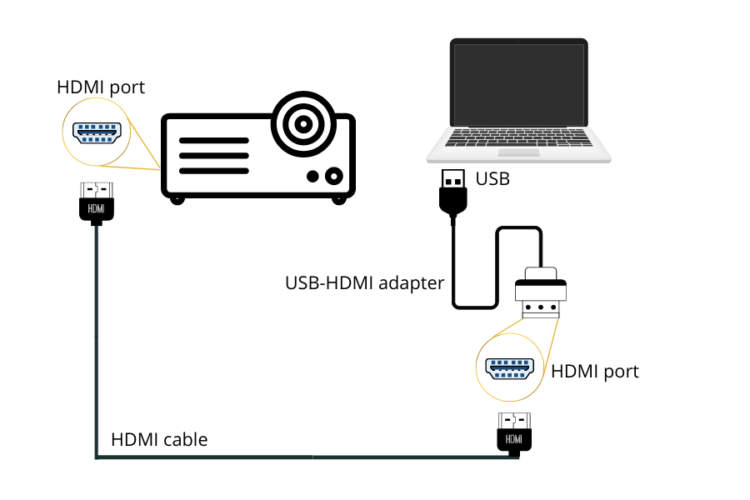
Things You Need
- VGA/HDMI cable
- A VGA port or HDMI port
- VGA to HDMI adapter (if necessary)
- Projector installed
Instructions
- Plug the VGA/HDMI cable into the VGA port or the HDMI port on your laptop.
- When the cable is secure, plug the other end of the VGA/HDMI cable into the projector.
- If you laptop doesn’t have a VGA port or HDMI port, then you need an HDMI to VGA adapter.
- If your laptop has both VGA and HDMI ports, plug the cable into the port you prefer.
- Turn on the projector.
- Find your laptop’s display settings (usually located in the control panel). Adjust your settings so the image you see on the projector is visible.
- Your laptop should now be connected to the projector.
Conclusion
You should now be connected to the projector with your laptop and ready to share your amazing creation! If the connection isn’t working as expected, make sure all cables are secure and try resetting the projector.
Verifying the Connection
Once you have connected the laptop to the projector and established the connection, it is a good practice to verify the connection. This ensures that your laptop and the projector are both communicating properly and you can see the projected image. Here is how to verify the connection.
Verifying the Connectivity
Once you have set up the connection between the laptop and projector, you can test the connection to make sure it is working properly. Depending on your laptop, there will be a few different ways to do this.
Using Display Settings
For Windows laptops, one of the easiest ways to check the connection is to go into the display settings. From here, you can adjust the display resolution and multiple monitor settings. This should show you if the projector is connected successfully. If you cannot adjust these settings, then it is likely that the connection was not established correctly.
Using a Test Image
One of the best ways to make sure the connection was successful is to try projecting a test image onto the screen. Most projectors have a pre-installed test image that you can use to check the resolution, brightness and color. This will help to make sure everything is working correctly.
Using Audio
Another way to make sure that you have established the connection correctly is to check the audio. If your laptop is connected correctly, then you should be able to hear the audio through the projector’s speakers. If you are unable to hear anything, then it is likely that the connection was not successful.
Conclusion
Connecting your laptop to a projector is a simple and straightforward process. All you need to do is make sure that your laptop has the correct video output, that all of the cables are properly connected, and that the projector is set up correctly. After that, you’ll be ready to go.
Overall, having a projector can really add to your presentations, presentations, and movies. Connecting it to your laptop is easier than you’d think. As long as you take your time, make sure all of the cables are connected properly, and have the right video output, you should have no problem connecting your laptop to the projector.