Facing Wi-Fi connection problems on your laptop can be very frustrating. Fortunately, you don’t have to be a tech-savvy user to troubleshoot these issues. This step-by-step guide will explain how you can go about fixing Wi-Fi connection issues on your laptop.
Before you start troubleshooting, make sure to check your Network Connections settings and make sure they are configured correctly. You should also update your laptop’s drivers, as outdated drivers often cause problems with your Wi-Fi connection. Finally, ensure that your router is working properly by resetting it and checking its connections.
Ensure WiFi is Enabled
Having trouble connecting to Wi-Fi on your laptop? Here’s a step-by-step guide to help you troubleshoot the problem. First, you’ll need to ensure that your Wi-Fi is enabled on your laptop.
Turning On Wi-Fi
Most laptops have dedicated keys for quickly enabling and disabling Wi-Fi on your device, usually with a blue WiFi symbol. Usually, these keys are combinations of the ‘fn’ key and either the ‘f2’, ‘f8’, or ‘f10’ keys. If you cannot find such a button, you can usually find these Wi-Fi settings within the device’s settings.
Finding Wi-Fi Settings
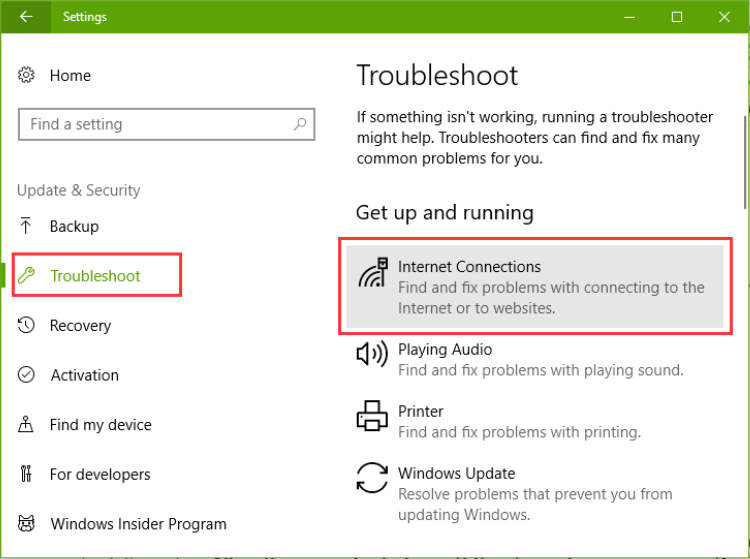
For Windows laptops, you can find the settings by going to Start > Settings > Network & Internet. Then, go to Wi-Fi in the left-side menu to open these settings. Enable Wi-Fi by click on the switch at the top of the settings.
For Mac computers, open the System Preferences, and then select the Network icon. In this menu, you can check or uncheck the “Wi-Fi” box to enable or disable Wi-Fi. Save changes and connect to networks via Wi-Fi in your list.
Troubleshooting Tips
- If a key combination doesn’t work, make sure the ‘fn’ key is pressed.
- It may be necessary to update the device driver for Wi-Fi connectivity.
- Disable any ad-blocking extensions that may interfere with Wi-Fi device detection.
- Check if your laptop is in airplane mode.
- You may need to reset or restart your router.
Now that you know how to best ensure that your Wi-Fi is enabled, use the rest of our step-by-step guide to troubleshoot your Wi-Fi connection.
Verify Your Connected Network
Wi-Fi connections give us the convenience of accessing the internet from any location, but occasional issues can sometimes disrupt that capability. In this article, you will be guided step-by-step on how to accurately troubleshoot your Wi-Fi connection to find the source of your problem.
Before you start troubleshooting your Wi-Fi connection, you must first verify the information of the Wi-Fi network that your laptop is connected to. To do this, simply find the icon of the Wi-Fi connection that is located on your laptop’s taskbar, on the bottom right side of the screen. Click on the icon to view the details of the network that you are connected to.
You will also be able to view the strength of your network connection. If the strength is weak, then there might be an issue with your hardware, and you should consider getting it checked. You should also check the following information:
- Check the name of the Wi-Fi network.
- Check the type of security used by the network (WEP, WPA, WPA2, WPA3).
- Check the encryption mode (TKIP/AES).
- Check if the router or access point is within your laptop’s range.
Once you have verified the information of the connected Wi-Fi network, you can try changing the settings and see if that helps with your connection issue. The next step would be to restart the router and see if that improves the connection.
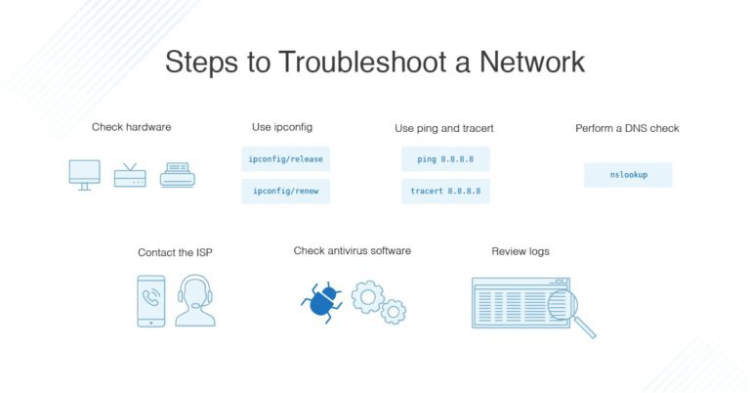
Perform Basic Network Troubleshooting
If you encounter any problems with your laptop’s Wi-Fi connection, the first step you should take is to perform a basic network troubleshooting. This procedure typically involves a simple set of steps which help you identify the cause of the issue. The following is a step by step guide that will help you get your Wi-Fi connection back up and running.
Step 1: Check your Network Settings
Go to your laptop’s network settings, and make sure that the Wi-Fi connection is enabled. If not, enable it by clicking the “Enable Wi-Fi” button or checkmark. This should solve the majority of the issues you may be experiencing.
Step 2: Network Troubleshooting Tool
If the issue persists, run the Network Troubleshooting Tool to identify the cause. Windows 10 has an integrated Network and Sharing Center that can be accessed by searching for “network troubleshoot” in the start menu. This will launch the tool which performs a series of checks, and provides detailed information about any potential issues.
Step 3: Restart Your Network Devices
If the Network Troubleshooting Tool fails to resolve the issue, try restarting the router and modem. This can often reset the connection, and restore the Wi-Fi connection.
Step 4: Update Your Drivers
If you are using an older version of Windows on your laptop, make sure the drivers for the network interface card are up-to-date. Outdated or corrupted drivers can cause connection problems. Drivers can be easily updated directly from the device manufacturer’s website.
Step 5: Contact Your ISP
If none of the earlier steps are successful, you should contact your Internet Service Provider (ISP). They should be able to help you identify and fix any potential issues with the Wi-Fi connection.
Reset or Update Your Wireless Adapter
Wireless adapters are a must-have item for a laptop if you want to connect to the Internet. Problem is, sometimes due to several factors such as compatibility issues, an adapter may need some troubleshooting to work properly. Resetting or updating your wireless adapter may help you solve the issue.
Resetting The Wireless Adapter
Resetting the wireless adapter is a huge help when you are experiencing difficulty in connecting to the Wi-Fi. Depending on your operating system, resetting the adapter can take a few simple steps as listed below:
- On Windows 10, go to your Settings page and scroll down to Network & Internet.
- Click on the Status tab and select Change Adapter Options.
- Right-click on the network adapter you wish to reset, and then click the Disable button.
- Once the adapter is disabled, right-click on it and select the Enable button.
Updating The Wireless Adapter
Update your wireless adapter driver to further improve the performance. This step can help if your Wi-Fi connection is unstable or slow. To update it, you can follow these steps:
- On Windows 10, go to your Settings page and click Update & Security.
- On the left panel, click Windows Update and select Check for updates.
- Look into the Additional Updates panel to check for available driver updates.
- Select the driver update and click Install Update.
Once these steps have been completed, the update should be applied and the wireless adapter should be running optimally.
Alternative Troubleshooting Options
If the standard troubleshooting steps described in the “Step by Step Guide to Troubleshoot Wi-Fi Connection on Your Laptop” do not solve the Wi-Fi connection issue, here are some alternative troubleshooting steps you can try:
Check the Router Settings
To begin with, make sure that the router settings are correctly set to allow your laptop to connect to the Wi-Fi. Check the router’s manual or contact the provider for help.
Check the Network Card Driver
Sometimes, outdated network card drivers can cause Wi-Fi connection problems. Try updating the network driver on your laptop to make sure it is up to date.
Check Compatibility with the Access Point
If you are not able to connect to a specific access point, make sure that your laptop is compatible with the access point. To do this, you may need to check the access point’s manual for its supported devices or contact the service provider to find out more.
Reboot the Router
Sometimes, simply rebooting the router or restarting the connection can help resolve Wi-Fi connection issues. You can try rebooting the router to see if that helps.
Use Another Access Point
If the current access point is not working, you can try connecting to another access point to see if your laptop is able to connect to it.
Conclusion
We have provided a step-by-step guide for troubleshooting the Wi-Fi connection on your laptop. With this guide, you should be able to analyze and fix any Wi-Fi issues you have. Remember to stay patient and to not rush into any decisions. Lastly, if all else fails, consider contacting your network service provider to get a better diagnosis.
If your Wi-Fi issue is more serious and you cannot fix it by yourself, it may be best to contact a professional to help. Sometimes, the issue can be more complicated than you think, so it always pays to be safe than sorry. On top of that, a professional may be able to help even faster than you can.