
It is extremely important to keep your laptop keyboard clean for optimal performance. Your laptop keyboard can quickly become dirty with dirt, dust, crumbs, and liquids. Fortunately, it is relatively easy to keep your laptop’s keyboard clean with proper maintenance.
Here are five essential tips for cleaning your laptop’s keyboard. With the right equipment and know-how, you can keep your laptop keyboard looking and working like new.
Gather the Right Tools
Having the right tools for the job is key to any task and cleaning your laptop keyboard is no exception. You will need items that will easily remove dirt and grime without risking damage to the keyboard or laptop. Here are the items you will need to clean your laptop keyboard:
- Soft bristled brush
- Canned air or dust blower
- Anti-static cloth or low lint cleaning wipes
- Keyboard vacuum
- Rubbing alcohol or mild cleaning solution
These items should be easy to obtain. Check with your local hardware or computer store see if they have dust blowers or vacuums which plug directly into your laptop. Spending a few extra dollars upfront for better tools will ensure the job is done right.
Shut Down and Unplug the Laptop
Shutting down and unplugging your laptop is the first essential step when it comes to cleaning your laptop keyboard. It is important to turn off your laptop before cleaning the keyboard to ensure maximum safety. This will help prevent any electric shocks that may occur when cleaning. Furthermore, unplugging the laptop will ensure that the critical components are protected from any liquids that may be used during the cleaning process.
For extra safety, you can disconnect the battery of your laptop too, so you can be sure that no electricity is running through it while cleaning the keyboard.
Vacuum Dust and Debris from Keys
One of the most important steps to cleaning your laptop keyboard is to remove the dust and particles that get caught in between the keys. Over time debris builds up and makes your laptop keyboard look dirty. To tackle this, you’ll need a vacuum and some compressed air. Vacuuming can usually remove the dirt and debris that can get wedged in between the keycaps. Make sure to use a soft brush attachment instead of the standard hose attachment. After vacuuming, you can use compressed air to give your keyboard a more thorough cleaning.
Here are steps to follow when vacuuming to remove dust and debris between the keys of your laptop keyboard:
- Use the brush attachment to loosen the debris.
- Vacuum the area and use the extension hose to get those hard to reach places between keys.
- Look closely at your keys for dirt, dust, and other particles.
- If stubborn debris still remains, use a can of compressed air to remove it.
- Once finished, wipe the laptop and keys with a clean, dry cloth.
These steps should help you to quickly and easily remove the dust and debris from between the keys of your laptop keyboard. Cleaning your laptop keyboard can help to extend its lifespan and keep it looking brand new!
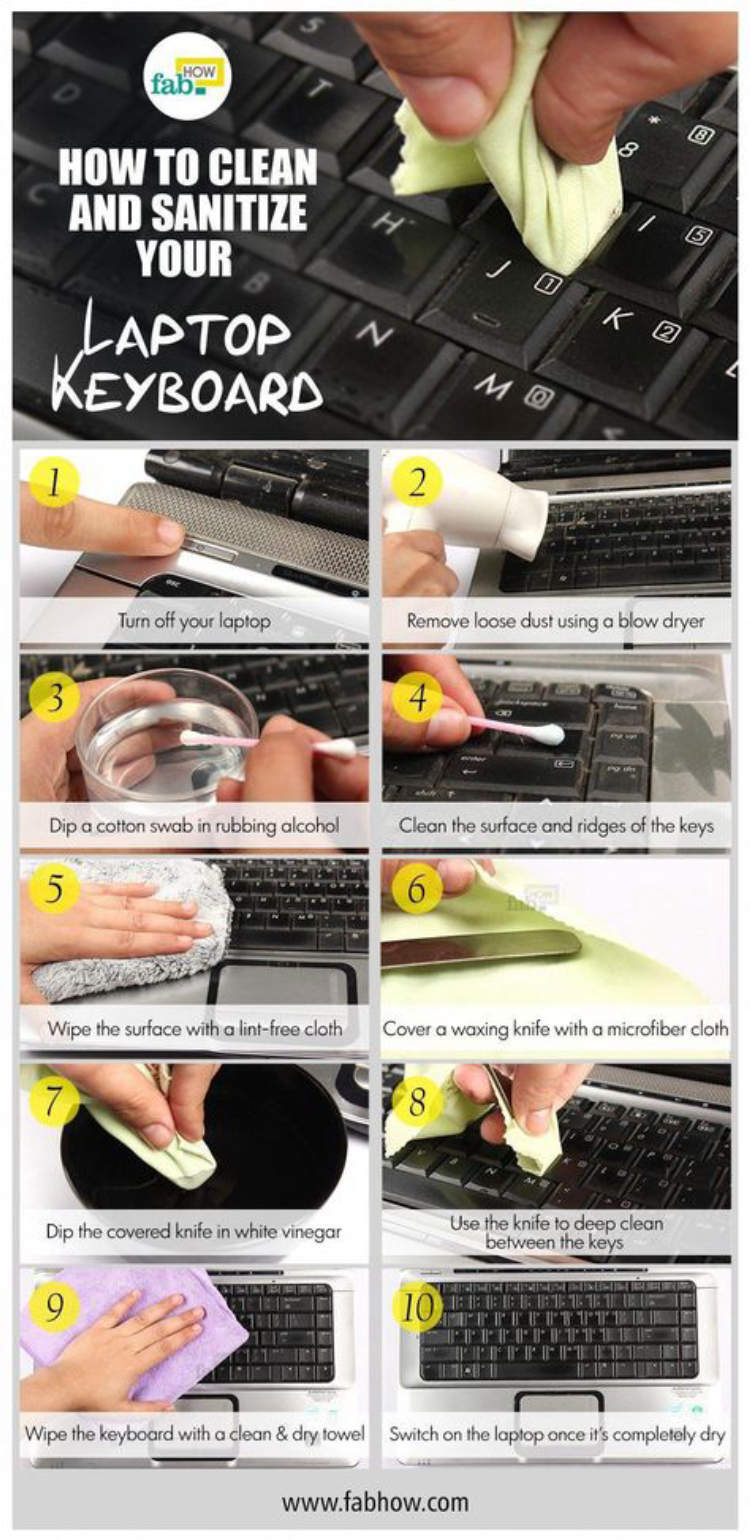
Clean Between Keys with Q-Tips and Isopropyl Alcohol
Dirt, food crumbs, and other substances can build up in the keyboard of your laptop, which can be hard to remove. Regular laptop maintenance can help improve the life of your hardware and ensure that it stays running at its best. One of the most important components to keep clean is the keyboard. Here are five essential tips for cleaning your laptop keyboard.
- Clean dust and dirt: Start by removing the keys on the keyboard. Using a vacuum cleaner with an attachment can help remove small particles and dust that can accumulate between and under the keys. If the dirt buildup is harder to remove, you can use a cotton swab moistened with water to help remove the grime.
- Clean between keys with Q-tips and isopropyl alcohol: After removing the the dirt and dust, you will want to get the grime out of the small crevices between the keys. For this, you will want to use Q-tips and isopropyl alcohol to get into the grooves of the keyboard. Dip the swab slightly into the isopropyl alcohol and move the swab around the crevices until you see the dirt lifted. Make sure to use a dry cloth or paper towels to dry the keyboard afterwards.
- Clean the surface: After cleaning between the keys, you can now clean the surface of the keyboard. For this, you can spray a small amount of alcohol-dipped cleaning solution on a microfiber cloth and wipe the surface of the keyboard. If the dirt buildup is more significant, you can dampen the cloth with isopropyl alcohol instead of the solution. Make sure to dry the surface with a separate cloth after wiping.
- Replace the keys: Once the keyboard is fully dry, you can replace the keys and secure them into place. Check to make sure the keys line up correctly before and after replacing them.
- Store properly: Keep the laptop running in top performance by storing it properly. Make sure to store the laptop in an area with temperatures below 80°F, away from direct sunlight.
Following these five essential tips can help keep your laptop keyboard clean and ensure that your laptop runs more efficiently. Regular cleaning maintenance can help improve the life of your laptop and keep it running in top performance for years to come.
Clean Around the Keyboard
Even though your laptop keyboard may appear to be impenetrable, it’s still important to clean around it to keep your laptop clean and sanitary. Start by using an air compressor to blow away any buildup of dust on the keyboard and the surrounding area. Moreover, you should use an electronic-safe damp cloth to clean any sticky and hard-to-reach areas. Finally, remember to clean the mouse and surrounding area as well.
Below are the steps for cleaning around the keyboard:
- Attach the air compressor to your laptop and run a few short cycles of air to remove as much dust as possible.
- Using a lint-free cloth and a small amount of water, gently rub the keyboard and surrounding area. Make sure not to get the water on the keys of the keyboard.
- Using a disinfecting wipe, clean the mouse and surrounding area.
- Dry the area with a microfiber cloth.
- Finish with a few short cycles of air from the air compressor to remove any remaining dust.
Conclusion
Keeping your laptop’s keyboard clean is essential for a better user experience. It is important to periodically remove dust and debris to ensure the laptop is working in its best condition. Dust particles can also cause damage to the laptop’s motherboard, leading to further problems. By following these 5 essential tips to clean your laptop’s keyboard, you can help extend its life and keep it from becoming sluggish and unresponsive. Staying proactive with your laptop maintenance is the best way to ensure long-term durability.
Ultimately, taking care of your laptop’s keyboard is one of the best ways to keep it working properly. Ensuring that keys are free from dust and other debris will help you get the most out of your laptop. Using the right cleaning techniques and supplies can make a big difference in the overall lifespan of your laptop and keep it running smoothly.